
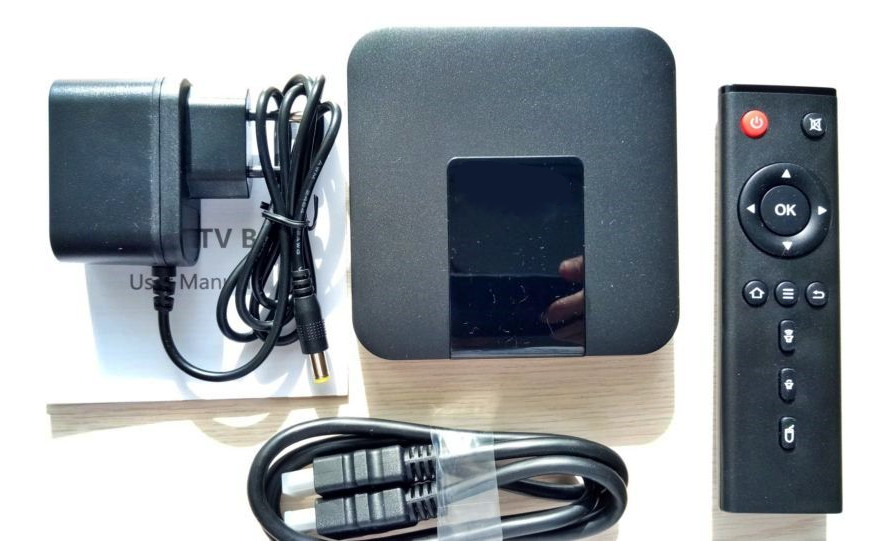
Verify the package contents
- CoreBOX/CoreBOX2 streaming TV box (original CoreBOX shown in photo)
- Power adapter
- Remote control (requires 2 AAA batteries, not included)
- HDMI cable
Connect the CoreBOX to your TV and power it up
Install two AAA batteries in the remote control.
Locate the CoreBOX near your TV, in a place where you will have a clear view of the faceplate (for the IR remote).
Connect the CoreBOX to your TV using the included HDMI cable. Select the input that matches your TV’s HDMI port according to the manufacturer’s instructions (the TV’s remote control should have an “input” button for this purpose).
If you will be using SPDIF optical digital audio on the CoreBOX, connect to your audio output device using a digital TOSLINK optical audio cable. Note that digital audio cables are not included with the CoreBOX. The mini A/V jack is not used on the CoreBOX. The coaxial SPDIF jack is not used on the CoreBOX 2.
If you wish to use Bluetooth audio, you will need to supply a compatible external USB Bluetooth adapter. You can set up Bluetooth once you have installed and powered up your CoreBox. See the article on settings for more info.
Connect the power adapter to the round DC power port on the back of the CoreBOX, then plug the other end into a wall socket. The CoreBOX will power up immediately, but if it does not, point the remote control at the front of the CoreBOX and momentarily press the red power button.
First-run configuration
Once CoreBOX has fully booted, you will be presented with a series of first-time setup dialog boxes, as follows:
Set your Language: Pick your prefered interface language from the list, or accept the default.
Connect to WiFi: If you have a wireless network within range of the CoreBOX, select your WiFi network and enter your password to connect to it. CoreBOX will remember this as your default network connection choice. If you are instead using a wired Ethernet connection, CoreBOX will automatically connect to your home network and be assigned an IP address by your router, assuming it is using DHCP (the default for most home routers). If you need to change any network settings, you can do this by selecting “System” from the home screen.
Enable SSH: If you have a need to do so, you can log into CoreBOX’s underlying operating system with a secure shell (SSH). Enable this option and set an SSH password to gain SSH root access. NOTE: this is not recommended unless you have a specific need to gain command line access the device, and you do so at your own risk. If you wish to learn more about using SSH/SCP with CoreBOX, consult the CoreELEC Wiki: https://wiki.coreelec.org/coreelec:ssh
Enable Samba: If you want to copy files to/from the CoreBOX’s internal storage, enable Samba to accomplish this. Note: in most cases, you will not store any files on CoreBOX’s internal storage as CoreBOX is designed to stream media from other storage devices/locations. If you wish to learm more about using Samba with CoreBOX, consult the CoreElec Wiki: https://wiki.coreelec.org/coreelec:smb
Your CoreBOX is Ready To Use!
For additional configuration and setup steps, see the next article.
Join The CoreBOX Owners Email List
Get updates and news about your CoreBOX by joining this mailing list for CoreBOX owners.