
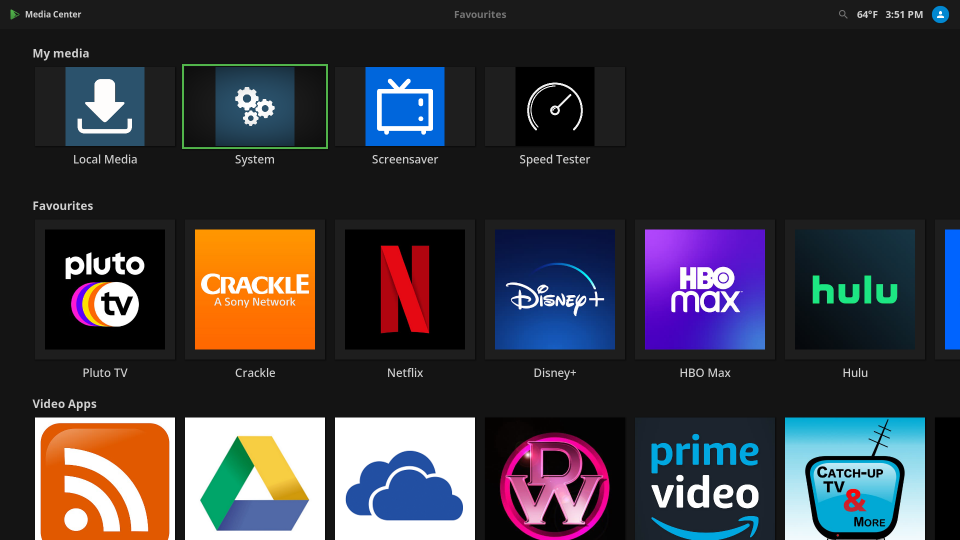
To access the CoreBox system configuration, highlight “System” on the home screen, then click the “OK” button on your remote control.
The CoreElec system configuration menu is used to configure settings for networking, Bluetooth, system updates, and more. Each group of settings is displayed by navigating to the group name (“System,” “Updates,” “Network,” etc) using your remote control. Within each group, you can use the arrow ring on your remote to scroll through various settings, and click the “OK” button to access/change setting. What follows is a brief discussion of commonly used settings:
System
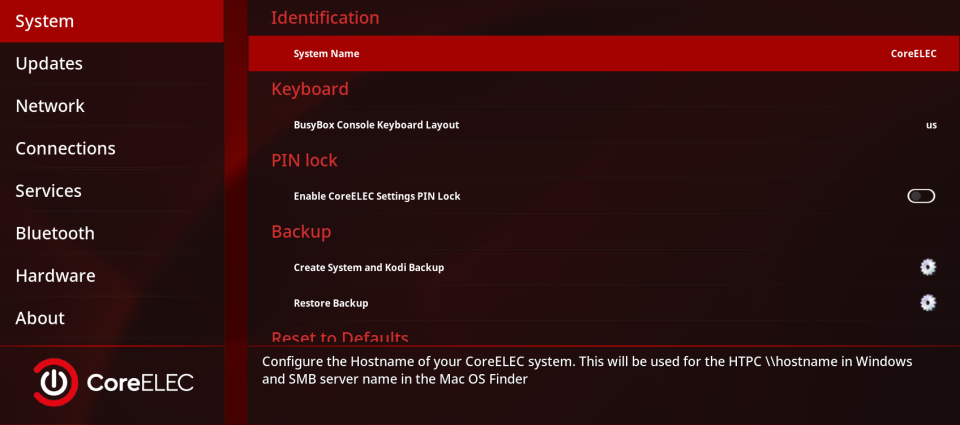
Identification
Here you can set the name for your CoreBOX – this is the name it will report to your network router, and it it’s also the device’s name for file sharing (Samba / NFS). You can set this, or leave it as the default name.
Keyboard
Change the language setting for the on-screen (“soft”) keyboard.
PIN Lock
You can set a pin for access to this Settings menu. CoreBOX users will be required to enter the pin you specify in order to access the settings area.
Backup
Create a backup archive of the current CoreBOX setup, addons, an configurations, or restore a previous backup to the CoreBOX. It’s advisable to use this function before making any significant changes to your CoreBOX media center configuration, addons, etc. Backups are stored in /storage/backup/ on the CoreBOX and can be manually copied to your desktop computer or other location by various means, including SCP, Samba/NFS, or OneDrive/Google Drive/other cloud storage add-on.
Reset to Defaults
Here you have a couple of options to a soft or hard reset of the system. In general, you would not want to do this unless instructed to do so by vendor support. NOTE: resets will permanently wipe some or all of your CoreBOX configuration and settings, including add-ons. Don’t do this unless you know what you are doing and have safely stored a backup first.
Upload Logs
Here you will find various options to upload system logs for analysis. In general, you don’t need to do this unless you are being instructed to do so by vendor support.
Updates
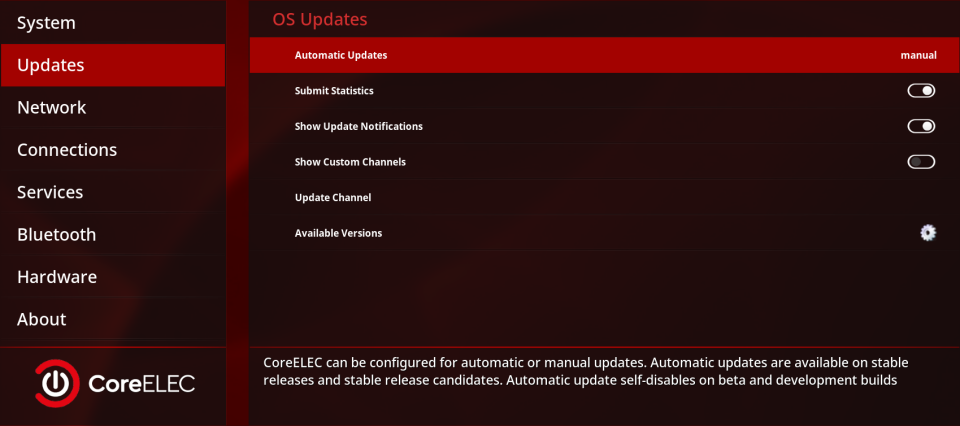
OS Updates
Automatic Updates
This section controls how the CoreBOX handles OS updates. You can toggle between automatic and manual updates. Our recommendation is that you leave the setting on manual, and only perform an update when you have a reason to or are dealing with functionality issues. Updates can fix problems, but they can also cause new issues that may affect the performance of the system and its various addons.
Submit Statistics
This setting will send anonymous usage statistics to the CoreElec development team when enabled.
Show Update Notifications
When enabled, this setting will cause the system to present you with an “update available” dialog when new system updates are released, and give you the option to install them.
Show Custom Channels, Update Channel, Available Versions
These options allow selection of alternate update channels (which differ from the main update distribution channel), as well as choosing alternate available distribution versions. In general, you don’t want to use these features unless instructed to by vendor support.
Network
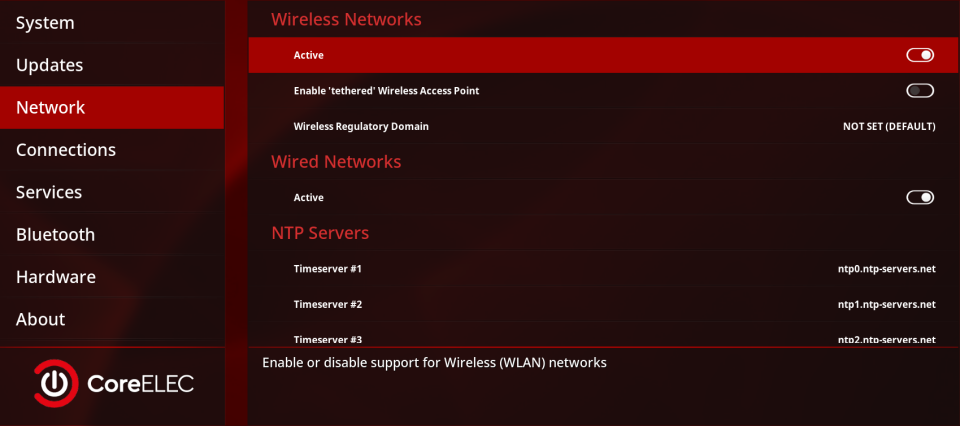
Wireless Networks
In this section, you can enable and disable wireless networking.
You can also enable the hotspot feature to allow another WiFi device to use your CoreBOX as an access point – note this feature is experimental and not recommended as it can affect performance of the device. If you use the tethering feature, you do so at your own risk. If you enable tethering, you’ll be presented with options to set the hotspot ID and password to be used by connecting devices.
You can select your wireless regulatory domain. You can select your own locale from the list, or leave it at the default (not set).
Wired Networks
In this section, you can enable and disable wired (Ethernet) networking support.
NTP Servers
Here you can specify time servers to be used by the underlying CoreElec linux system, or keep the default servers. Note that setting of your time zone and local time format are functions performed in the media center (see article).
Advanced Network Settings
You can enable a delay in the startup sequence that causes CoreBOX to wait for a network connection before starting the XMBC/Kodi media center.
If you enable the above, you have the option of setting a maximum time to wait for network connectivity, or accept the default value (10 seconds).
You can enable or disable the built-in CoreBox firewall. Basic information about the firewall can be obtained by highlighting this option. If you are behind a home Internet router, it is unlikely that you need this feature. If you do choose to use it, and subsequently experience network connectivity problems, disable it to see if connecitivity is restored.
Connections
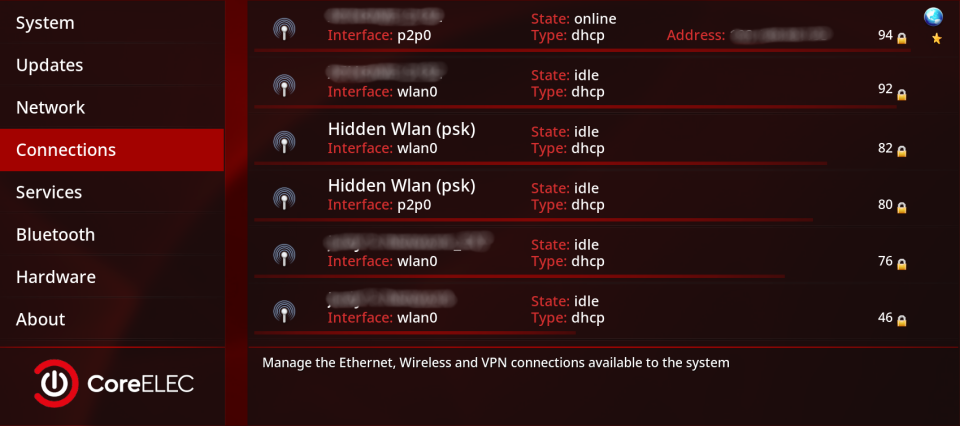
This section displays your available and active wireless and wired network connections.
Assuming that your home Internet router uses DHCP (essentially all of them do), the CoreBOX will be assigned an IP address on your home network as soon as it is connected to a wired or wireless network.
Wired networks generally don’t require a password, so if you’ve enabled wired networking in the CoreBOX, and you plug an Ethernet cable into its Ethernet jack, it should automatically connect to your home network and get an IP address.
If you’ve enabled wireless (WiFi) networking and wish to use that option, locate your SSID (the name of your WiFi network, highlight it, click the “OK” button on your remote, then choose “Connect” from the dialog box. You’ll need to supply the password for your network, then click “OK” to connect. Like with wired networks, your router should assign an IP address to the CoreBOX once connected.
While it’s possible to be connected to both a wired and a wireless network at the same time, this practice is not recommended.
Note that the CoreBOX has two wireless adapters, named “wlan0” and “p2p0.” You’ll see each available wireless network appear twice in the networks list, once for each adapter.
- Wlan0 is the standard WiFi network adapter, like you will find on most wireless Internet devices.
- P2p0 is the WiFi Direct adapter. WiFi Direct is a wireless networking protocol designed to allow devices to establish WiFi connections with each other directly without the use of a WiFi router.
You should choose wlan0 for your WiFi connection, as this is the protocol most widely supported by Internet routers. If you have issues with connectivity via wlan0, you try p2p0, but your router may not support it as it’s an emerging protocol and is still experimental on some devices.
Services
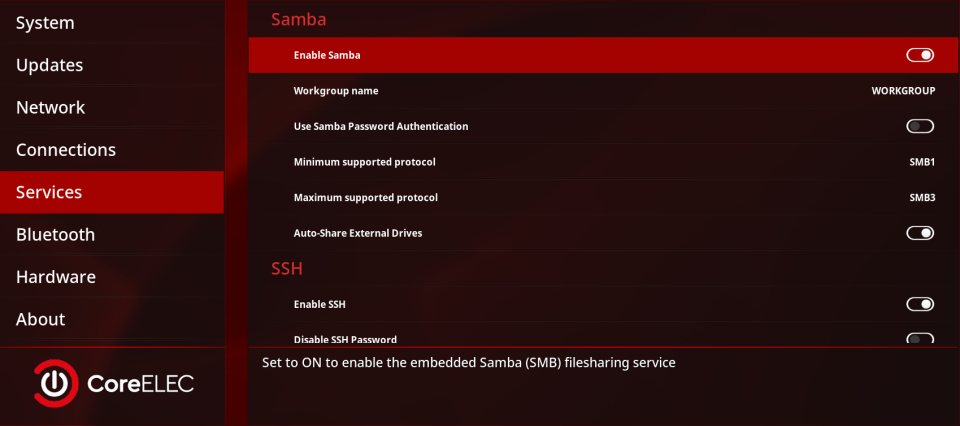
Samba
Use this toggle to enable the sharing of files from the CoreBOX. This not a typical configuration, as usually the CoreBOX will connect to other file shares on your network via Samba to stream media from those devices/locations. Configuration of that feature is covered in the article about streaming your local media to the CoreBOX. If you wish to share media files from the CoreBOX (or devices directly attached to it) to other devices on your network, enable this option, then:
Workgroup name
Set the NetBIOS workgroup name for your Samba network.
Use Samba Password Authentication
Enable this option and supply a password that will be required for other devices to connect to the CoreBOX file shares.
Minimum supported protocol
The minimum SMB protocol you wish to support for Samba connections to the CoreBOX.
Maximum supported protocol
The maximum SMB protocol you wish to support for Samba connections to the CoreBOX.
Autoshare external drives
Toggle this option to automatically share any USB or SD storage devices that are directly connected to the CoreBOX.
SSH
You can enable/disable the SSH server on the CoreBOX. SSH (Secure SHell) and it’s cousin SCP (Secure CoPy) allow you access the command line of the underling CoreElec operating system, as well as transfer files to/from the device. Note: it is not advisable that you connect to the CoreBOX via SSH or run commands on the command line unless you know what you are doing. Serious damage can be done to the system through spurious use of commands.
SCP (Secure CoPy) is a relatively safe means of copying files, such as backups, FROM the CoreBOX, using free utilities such as WinSCP.
If you enable SSH, it is highly advisable that you do NOT disable the SSH password requirement. Also, set a password of your own rather than keeping the default.
Cron
This section allows you to enable the cron service for CoreBOX, which is used to run regularly scheduled commands. This is an advanced feature that requires command-line access and knowlege of Unix shell scripting. It’s not needed for normal CoreBOX operation, and it’s recommended that you leave it disabled.
Bluetooth
Here you can enable Bluetooth service on your CoreBOX. Note: you will need to obtain a compatible external Bluetooth adapter to use this option.
OBEX enabled
Turning this feature on will allow the transfer of files to the CoreBOX over Bluetooth. This feature is considered experimental and is not recommended.
Idle Timeout
You can optionally set a timeout for devices, such as bluetooth speakers, connected the CoreBOX. If the timeout time is exceeded with no activity, CoreBOX will disconnect the bluetooth device. Leave it at “none” for no connection expiration.
Connect paired devices
Enable this setting to have CoreBOX automatically reconnect to paired device(s) at startup.
Switch audio device on connection
Enable this setting to have CoreBOX automatically switch audio output from your default output (HDMI or optical audio) the first connected Bluetooth audio device.
Terminal sharing
This option allows CoreElec developers to connect to your device. Only enable this setting if instructed to do so by vendor support.
Bluetooth
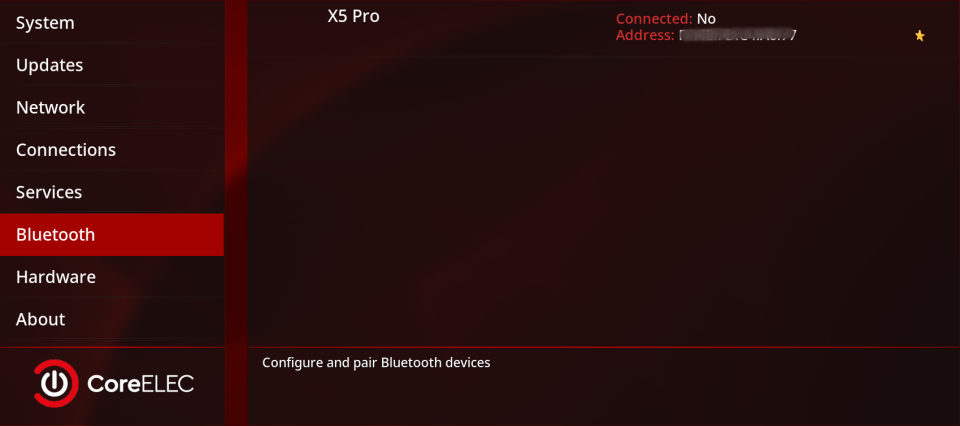
This section will display the available and connected Bluetooth devices if you have Bluetooth service enabled and have installed a compatible external USB Bluetooth adapter.
To connect to a device, highlight it, click the “OK” button, and select “pair and connect” from the menu. You can also disconnect and “forget” (remove) devices in this way.
Hardware
The settings in this section should be left on their defaults. It is inadvisable that you change any of these, unless instructed to do so by vendor support.
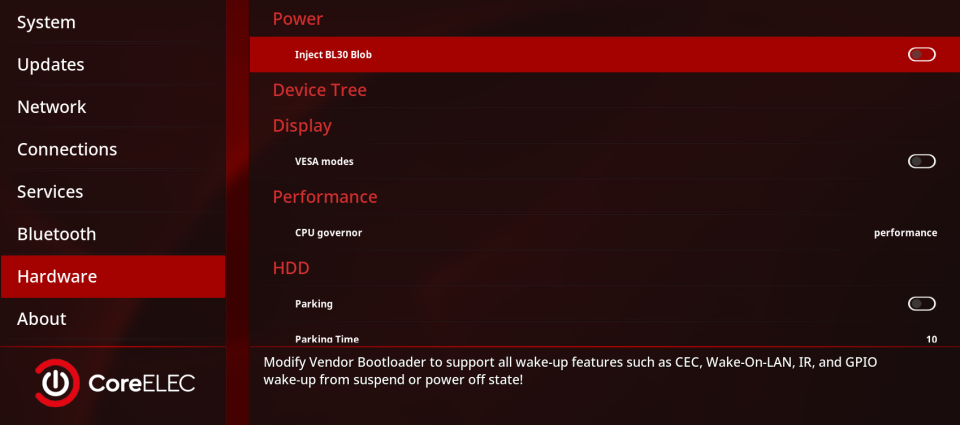
Power
Inject BL30 Blob
Enabling this adds additional “wake on” support to the CoreBOX, beyond pressing the power button on the remote control. The Device Tree will display various “wake on” devices that can be configured when this is enabled.
Display
VESA modes
Enabling this enables VESA Video Modes, which may improve display quality and performance, but only if your TV can take advantage of it.
Performance
CPU governor
Changes cpu performance profile setting.
HDD
None of these settings are applicable to the CoreBOX, as it does not utilize a spindle-type hard disk.
About
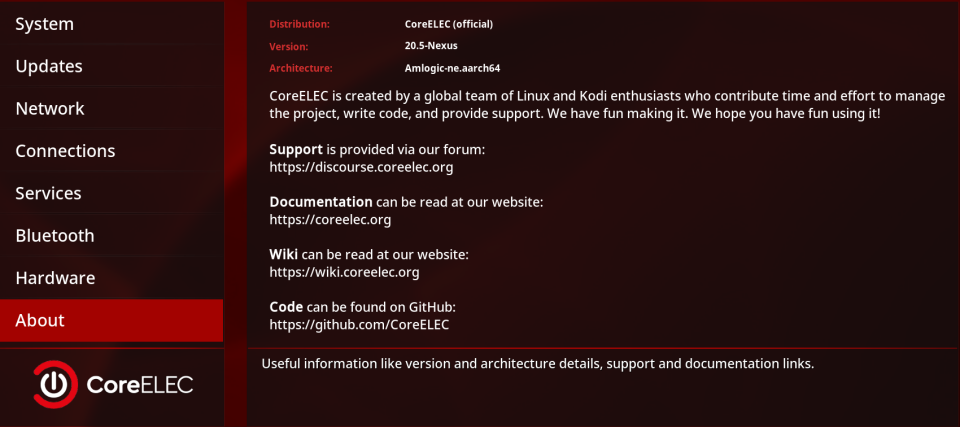
This section provides various information about the operating system on your CoreBOX and the URLs for additional support resources.
That’s it for the CoreBOX system configuration!
Several additional settings from within the media center portion of CoreBOX are available to control other functions and features. Please consult the article for your area of interest.